The user interface
Overview
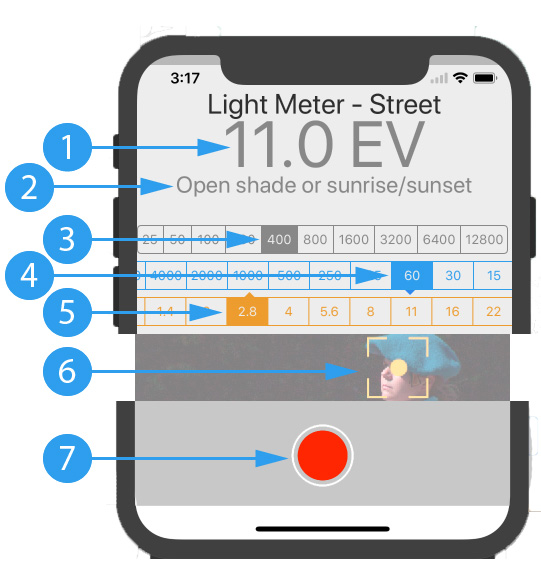
The goal of the user interface is to have a very simple user interface with basic to none user interactions for the measurement. For this reason the only important setting is the ISO. Also only full stop aperture values are displayed allowing fast and less distracting readings. But interim values can be easily read.

-
Displays the exposure value of the last measurement. In simple words it is a number that represents the current amount of light. Or a bit deeper look on Wikipedia. This number does real magic if your time is set to the ISO read more later.
-
This is a textual representation that is associated with the exposure value. This is often referred to as Sunny 16 rule. Although you likely know what scene you’re currently measuring, the text helps you to remember a small sentence and a more abstract number.
-
The all important ISO setting. Just touch the ISO setting of your current film or a bit higher if you’re going to push the film. This setting is the only important setting. All other settings are automatically calculated for you.
-
The time scale. It moves with the current measurement. You can select one of time settings so it will be visualized. I often set it to the focal length of my camera. E.g. for my 40mm lens rangefinder I select 60, so it gives me a visual hint of when I will risk blurry images through camera shake.
-
The aperture scale. It moves just like te time scale with the current management. Also an aperture can be set here. I often select the minimal aperture. E.g. on my 1.7 range finder I’d select the 2.0 field.
-
Spot metering. Press anywhere on the camera image in order to spot meter this area. This will also lock the exposure allowing you to investigate the scene. Pressing on the spot meter icon again will return to normal metering. This functionality helps you to measure for the shadows or create low-key images if you press on light areas.
-
The measure button. Press to make continuous readings. Press again, will stop the camera and show you the last measurement taken. Hint: The camera consumes battery life, so better stop reading when done.
For reading just use combinations that are above each other. If you inspect the image above you see the following valid exposure combinations and all of them lead to the very same exposure.
| Time | Aperture |
|---|---|
| 4000 | 1.4 |
| 2000 | 2 |
| 1000 | 2.8 |
| 500 | 4 |
| 250 | 5.6 |
| 125 | 8 |
| 60 | 11 |
| 30 | 16 |
| 15 | 22 |